상품 페이지에서 사용자 리뷰 및 별점 추가하기
사용자 리뷰 추가하기
사용자 리뷰용 모델 생성
content의 models.py 파일에 아래와 같이 필요한 정보를 수집할 테이블을 생성합니다.
class ProductReview(models.Model):
    review = models.TextField()
    nickname = models.TextField()
    product_id = models.IntegerField()
    star = models.IntegerField(default=0)
사용자 리뷰 페이지 작성
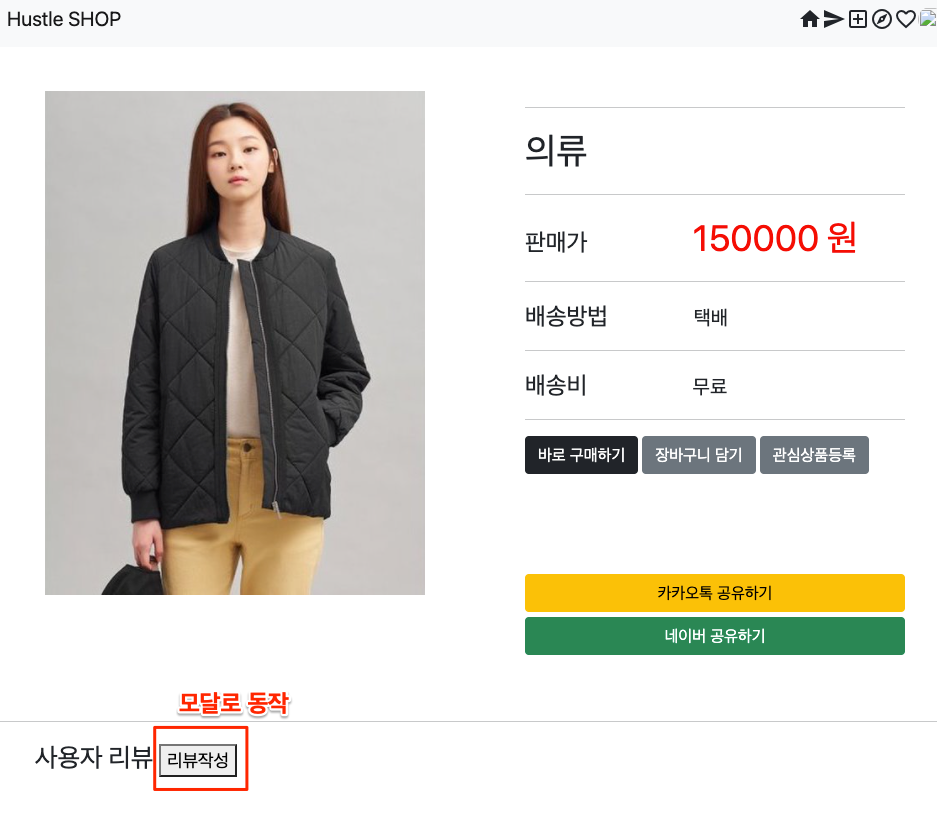
사용자 리뷰 글씨 옆에 리뷰 등록을 위한 버튼을 놓고 모달로 동작하도록 설정하려고 합니다. 버튼을 누르면 'reviewModal' ID를 가진 모달이 실행되도록 data-bs-target의 값을 수정해 입력합니다.
<div style="margin-left: 40px; font-size: 26px">
    사용자 리뷰
    <button style="font-size: 18px" data-bs-toggle="modal" data-bs-target="#reviewModal">리뷰작성</button>
</div>
메인 페이지에서 상단 +버튼을 눌렀을때 동작하던 모달을 복사해서 ID를 'reviewModal'로 변경하고, 나눠져있던 div 칸을 없애고 텍스트 화면만 남겨놓습니다.
<div class="modal fade" id="reviewModal" tabindex="-1" aria-labelledby="exampleModalLabel" aria-hidden="true">
    <div class="modal-dialog">
        <div class="modal-content">
            <div class="modal-header">
                <h5 class="modal-title" id="exampleModalLabel">리뷰 올리기</h5>
                <button type="button" class="btn-close" data-bs-dismiss="modal" aria-label="Close"></button>
            </div>
            <div class="modal-body">
                <div class="mb-3">
                    <textarea id="input_content" class="form-control" id="exampleFormControlTextarea1"
                              style="height: 200px"></textarea>
                </div>
            </div>
            <div class="modal-footer">
                <button type="button" class="btn btn-secondary" data-bs-dismiss="modal">Close</button>
                <button id="review_save_change" type="button" class="btn btn-primary">Save changes</button>
            </div>
        </div>
    </div>
</div>
사용자 리뷰 로직 작성
html 파일 하단에 모달 동작을 위해 자바스크립트를 추가합니다.
$('#review_save_change').click(function () {
const review = $('#input_content').val(); // 리뷰내용
const nickname = "{{ user_info.nickname }}"; // 글작성자
const star = rating.rate
$.ajax({
url: "{% url 'review' %}",
method: "POST",
data: {
review: review,
nickname: nickname,
product_id: {{ product.id }},
star: star
},
success: function (data) {
console.log("성공");
alert("리뷰 쓰기 성공");
},
error: function (request, status, error) {
console.log("에러");
alert("리뷰 쓰기 실패");
},
complete: function () {
console.log("무조건실행");
location.reload(true);
}
});
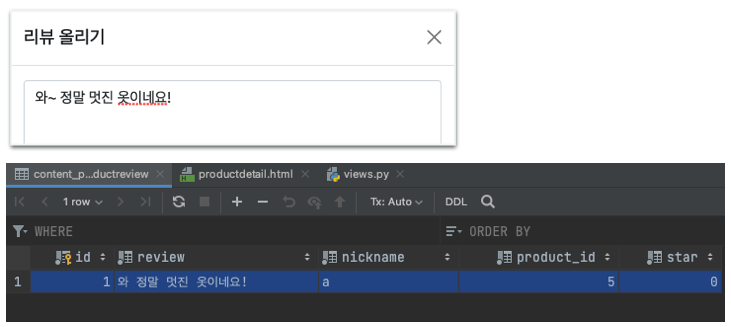
})content의 views.py 파일로 가서 아래 코드를 추가 입력합니다.
class CreateReview(APIView):
    def post(self, request):
        review = request.data.get('review')
        nickname = request.data.get('nickname')
        product_id = request.data.get('product_id')
        star = request.data.get('star')

        ProductReview.objects.create(review=review, nickname=nickname,product_id=product_id,star=star)

        return Response(status=200)
코드를 실행하고 웹 페이지에서 데이터가 잘 저장되는지 확인합니다.
별점 추가하기
별점 처리 코드는 apost님의 블로그를 참조했습니다.
위 블로그에 첨부된 별 그림 파일을 다운로드 받아 파이참의 media 폴더에 옮겨 놓고, 헤더 안에 아래 스타일 코드를 추가합니다.
<style>
.rating .rate_radio {
    position: relative;
    display: inline-block;
    z-index: 20;
    opacity: 0.001;
    width: 40px;
    height: 40px;
    background-color: #fff;
    cursor: pointer;
    vertical-align: top;
    display: none;
}

.rating .rate_radio + label {
    position: relative;
    display: inline-block;
    margin-left: -4px;
    z-index: 10;
    width: 40px;
    height: 40px;
    background-image: url("{% get_media_prefix %}starrate.png");
    background-repeat: no-repeat;
    background-size: 40px 40px;
    cursor: pointer;
    background-color: #f0f0f0;
}

.rating .rate_radio:checked + label {
    background-color: red;
}
</style>
사용자 리뷰를 작성하는 모달 안에 아래 코드를 textarea 아래에 붙여 넣습니다.
<div class="review_rating">
    <div class="warning_msg">별점을 선택해 주세요.</div>
    <div class="rating">
        <!-- 해당 별점을 클릭하면 해당 별과 그 왼쪽의 모든 별의 체크박스에 checked 적용 -->
        <input type="checkbox" name="rating" id="rating1" value="1" class="rate_radio" title="1점">
        <label for="rating1"></label>
        <input type="checkbox" name="rating" id="rating2" value="2" class="rate_radio" title="2점">
        <label for="rating2"></label>
        <input type="checkbox" name="rating" id="rating3" value="3" class="rate_radio" title="3점">
        <label for="rating3"></label>
        <input type="checkbox" name="rating" id="rating4" value="4" class="rate_radio" title="4점">
        <label for="rating4"></label>
        <input type="checkbox" name="rating" id="rating5" value="5" class="rate_radio" title="5점">
        <label for="rating5"></label>
    </div>
</div>
별점 동작을 위해 모달 실행 자바스크립트 내에 아래 코드를 추가로 입력합니다.
function Rating() {
};
Rating.prototype.rate = 0;
Rating.prototype.setRate = function (newrate) {
    //별점 마킹 - 클릭한 별 이하 모든 별 체크 처리
    this.rate = newrate;
    let items = document.querySelectorAll('.rate_radio');
    items.forEach(function (item, idx) {
        if (idx < newrate) {
            item.checked = true;
        } else {
            item.checked = false;
        }
    });
}
let rating = new Rating();//별점 인스턴스 생성

document.addEventListener('DOMContentLoaded', function () {
    //별점선택 이벤트 리스너
    document.querySelector('.rating').addEventListener('click', function (e) {
        let elem = e.target;
        if (elem.classList.contains('rate_radio')) {
            rating.setRate(parseInt(elem.value));
        }
    })
});
리뷰 출력하기
메인페이지에서 상품 상세페이지로 이동할 때 동작하는 로직인 ProductDetail(APIView) 안에 해당 상품 ID와 일치하는 리뷰를 불러올 수 있도록 reviews 리스트를 만들고, 이를 return 값으로 내보내도록 추가합니다.
reviews=ProductReview.objects.filter(product_id=product.id).order_by('-id')return render(request, 'content/productdetail.html',
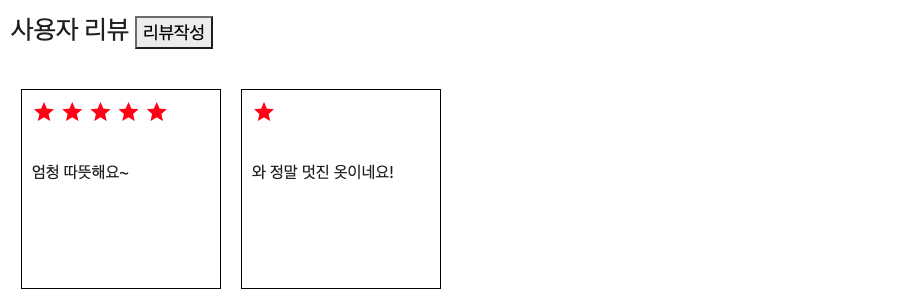
context=dict(product=product, user_info=find_user, reviews=reviews))리뷰 등록 아래에 카드 형태로 리뷰가 표시되도록 설정합니다.
<div style="display: flex; flex-direction: row; margin: 40px">
    {% for r in reviews %}
        <div style="border: 1px solid black; width: 200px; height: 200px; padding: 10px; margin: 0px 10px">
            {% for i in "x"|rjust:r.star %}
                <span class="material-icons-outlined" style="color: red">star</span>
            {% endfor %}
            <div style="margin-top: 30px">
                {{ r.review }}
            </div>
        </div>
    {% endfor %}
</div>
웹 상에서 잘 출력되는지 테스트 해봅니다.
'Django(웹서비스 만들기)' 카테고리의 다른 글
| [12주차] Docker로 실행하기 (0) | 2022.02.21 |
|---|---|
| [11주차] 프로젝트-3 (0) | 2022.02.11 |
| [9주차] 프로젝트-1 (0) | 2022.01.15 |
| [8주차] 쇼핑몰 페이지 만들기 (0) | 2022.01.15 |
| [7주차] 여러 서비스 연계하기 (0) | 2022.01.08 |


